
In today's mobile-centric world, having the flexibility to switch carriers or use local SIM cards while traveling is invaluable. However, network-locked devices can hinder this freedom. This guide delves into the intricacies of network locks on iOS and Android devices and provides detailed steps to unlock them legally and safely.
What Is a Network, Carrier, or SIM Lock?
"Network lock," "carrier lock," and "SIM locked" all refer to the same restriction: your phone is tied to the original carrier and can’t connect to other networks until unlocked.
Why do carriers do this? To make devices more affordable, some carriers sell phones at a discount and lock them to their network. This ensures you stay with them long enough to recoup the cost.
You might see error messages like:
- "SIM Not Supported"
- "SIM Not Valid"
- "Enter SIM Network Unlock PIN"
Or you may notice a closed lock icon in your settings—more on that below.
What Does the Closed Lock Icon on a Network Mean?
If you see a closed lock icon next to your network or in your phone’s settings, it usually means your device is carrier locked. This means your phone can’t connect to other networks; it’s restricted to the carrier it was originally sold with.
On iPhones, you can check this by going to Settings > General > About and looking under Carrier Lock. If it says “SIM locked” or shows a lock icon, your phone won’t accept SIM cards or eSIMs from other carriers until it’s unlocked. On Android, the closed lock icon may appear in the SIM status or mobile network settings.
If you’re trying to switch carriers or use a travel SIM, this icon is a red flag. You’ll need to contact your current carrier to request an unlock. Once the device is unlocked, the icon disappears or is replaced with a message like “No SIM restrictions.”
Why Do Carriers Lock Phones?
Carriers subsidize devices to make them more affordable, recouping the subsidy through service contracts. Network locks ensure customers remain with the carrier for a specified period, securing the return on investment.
What to Consider Before Buying
The discounted price tag is alluring but the contract usually lasts one year at least. Take some time to ponder the following to avoid buyer's regret:
Personal Experience
Think back on your own experience with the carrier. Have you been satisfied with their network performance? Their customer service quality? What about their fee transparency?
Total Expenses
Pull out your calculator and consider the total expenses. I.e., the discounted device cost + the monthly/yearly contract fee. Based on the package you'll receive (calls, SMSes, mobile data, etc), does the number make sense?
Future Travel
This might be one factor most affected by network lock. If you're travelling domestically, it might be a non-issue. However, international travel is completely different. Many users would want to find a local SIM card or a travel eSIM with no roaming charges like Eskimo eSIM to get a better deal for their connectivity. A network lock status will prevent you from doing this entirely.
Secondary Profile
You might need a secondary SIM/eSIM, typically for work purposes. This second profile is usually only used for its mobile number for people to contact you. As such, you probably won't need any mobile packages for it. If your primary provider has no SIM/eSIM profile for this, you might have to end up paying for a second contract just to get a new mobile number.
Unlocking Policies
Every carrier has a different policy on the matter. It's important to consult them and understand the fine print before going ahead with your purchase. The most important thing to note is: that the restriction might remain on your device even after you've completed the contract.
Checking iOS Network Lock Status
- Go to Settings
- Tap General
- Click on About
- Scroll down and select Carrier Lock
- If your device is unlocked, you will see that the status reads No SIM restrictions like in the screenshot below.
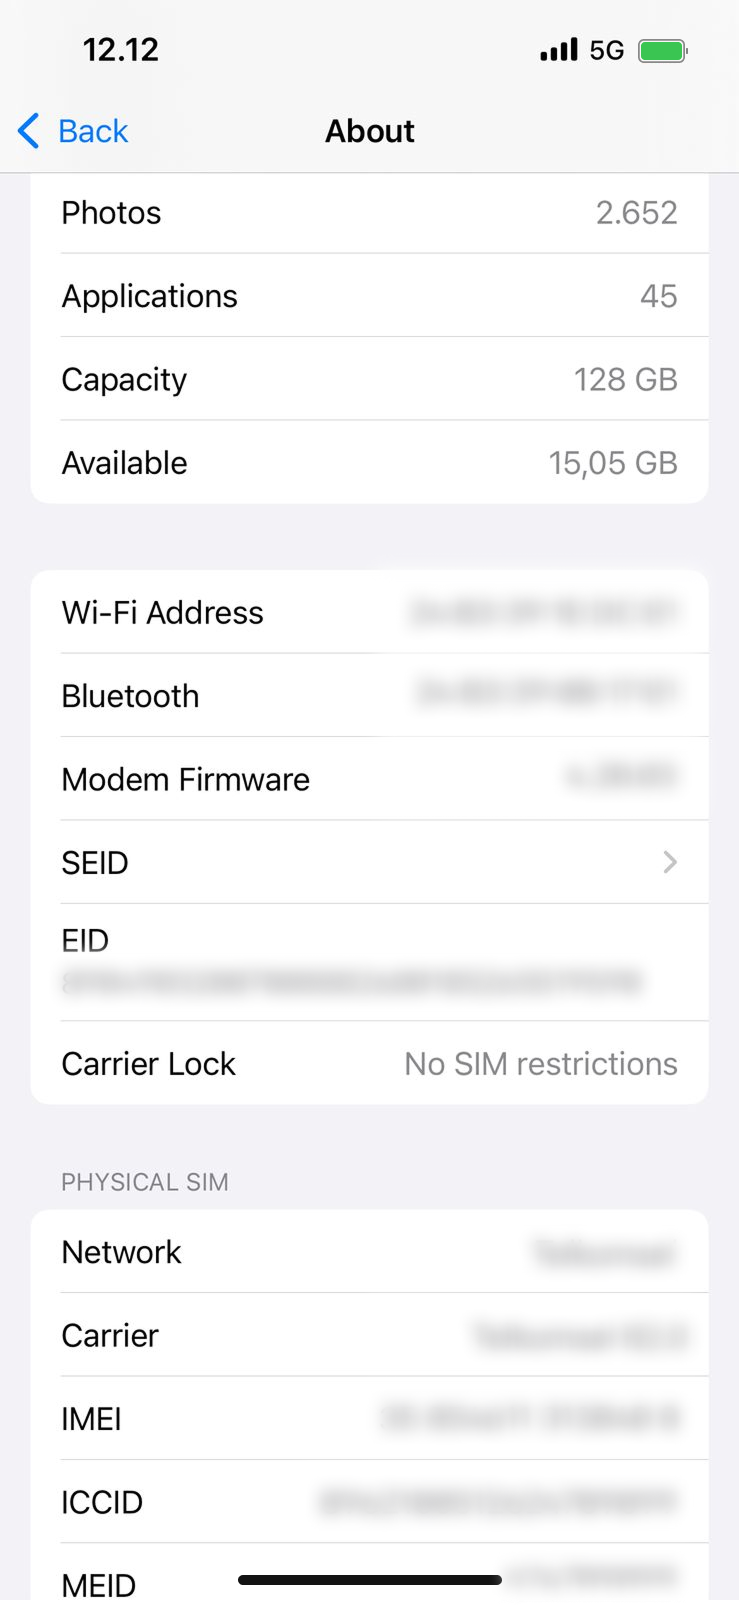
Unlocked iOS device showing No SIM restrictions on its settings page, meaning that this device is not network, SIM or carrier-locked
Checking Android Network Lock Status
Please note that settings might vary from brand to brand.
- Go to Settings
- Find Connections
- Select Mobile networks
- Click on Network operators
- Disable Select automatically
- Your device is unlocked if you can find other providers listed under Available networks.
Using Other SIM Cards or eSIMs
This is an easier way of checking if you have a SIM card or eSIM from another carrier. This can be applied to both iOS and Android devices.
SIM Cards
- Remove your primary SIM card and insert the other SIM card.
- Try placing a call or sending an SMS.
- If you can successfully place a call or send an SMS, your device is unlocked.
eSIMs
- Try installing the other eSIM onto your device.
- If you can install the eSIM, your device is unlocked.
How to Unlock iPhone and Android Carrier
Step 1: Verify Eligibility
Contact your carrier to confirm your device's eligibility for unlocking. Ensure all contractual and financial obligations are met. If your contract is incomplete, you could be asked to pay extra to "complete" the contract.
Step 2: Submit an Unlock Request
If eligible, request an unlock through your carrier's customer service or online portal. Approval times vary by carrier and could take between a few days to a few weeks.
Step 3: Unlock Confirmation
Upon approval, you'll receive confirmation. Follow any specific instructions provided by the carrier.
Step 4: Complete the Unlock Process
Insert a SIM card or install an eSIM from a different carrier. Your device should automatically connect to the new network.
Third-Party Unlock Services
We strongly discourage and should be used as a last resort.
Potential Risks and Considerations
- Warranty Void: Unauthorized unlocking could result in a breach of contract and land you in legal trouble.
- Device Damages: Improper unlocking can lead to hardware and software malfunctions.
- Scams: Possibility of losing your payment or device entirely.
Network-Unlocked Benefits
- Wider Network Selection: You can now consider all the available plans from the different local providers and find the one that suits your needs the most.
- International Travel Benefits: The selection freedom extends to international carriers (like our Eskimo eSIM).
- Faster System Update: Without a carrier in the middle, your manufacturer can now deliver a system update straight to your device. A network-locked device tends to receive a system update a few weeks or months later than an unlocked device.
- Increased Resaleability: A network-unlocked device can work with any carrier, making it more desirable than those tied to one specific carrier.
Conclusion
Unlocking your iOS or Android device can enhance flexibility and device usability. Always prioritize legal and safe methods, starting with your carrier's guidelines. Thorough research and adherence to legal frameworks ensure a smooth unlocking experience. If your device is eSIM-compatible, you can try installing Eskimo eSIM for free.